Exposing Kafka through different AWS VPCs
Apache Kafka is an streaming distributed platform that allows companies and organizations to have a central platform where data from their different services can be streamed. It is a resilient distributed platform that ensures zero data loss with its system of data replication over the kafka cluster.
Kafka implements the architecture model Publish-Subscriber. This architecture solves the common problem in organizations about having interconnected services around all the organization, what is commonly known as Spaguetti Architecture.
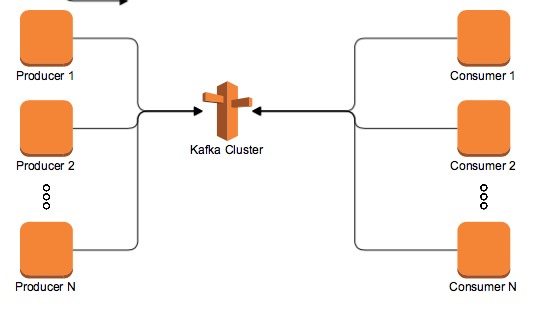
Without going into too much detail about how Kafka works and how the data is partitioned over all the kafka brokers, this is a simple diagram that shows what Kafka does and what it is the Publish-Subscriber model:
The main objective of this post is to show how a Kafka cluster deployed in AWS can be migrated from a single VPC to a multi VPC architecture.
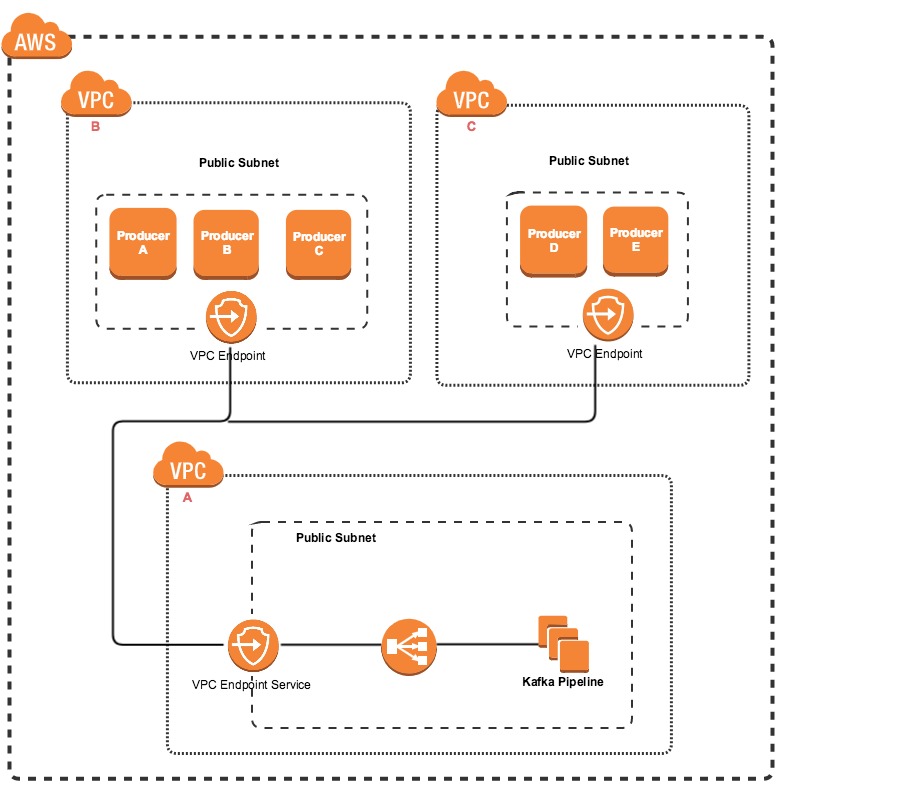
The main reason to create this kind of architecture instead of a single vpc one, is due to flexibility. The producers can be deployed in different VPCs from different AWS accounts and the Kafka cluster can be deployed in its VPC.
The communication between AWS accounts is achieved by the VPC endpoints. A VPC endpoint Service is created on the Kafka pipeline VPC that is routing the data to an NLB connected to the Kafka brokers. The producer side communicates with the VPC Endpoint Service using a VPC Endpoint.
Structuring a bit, the work to be done can be summarized in:
- Kafka pipeline VPC
- Deploy the NLB and the VPC Endpoint Service.
- Configure the Kafka instances to add the VPC endpoint Service endpoints as advertised listeners.
- Producer VPC
- Deploy the VPC Endpoint and add a Route 53 endpoint.
Implementation
Network Load Balancer and Target Groups
It is important to notice that there is a one to one relationship between the Kafka Broker(EC2 instance) and the TargetGroup.
It is required to create an NLB. To create an NLB is quite simple:
NetworkLoadBalancer:
  Type: AWS::ElasticLoadBalancingV2::LoadBalancer
  Properties:
    Name: !Sub ${Function}-${Environment}
    Type: network
    Scheme: internal
    Subnets: !Ref NLBSubnets
    LoadBalancerAttributes:
      - Key: load_balancing.cross_zone.enabled
        Value: true
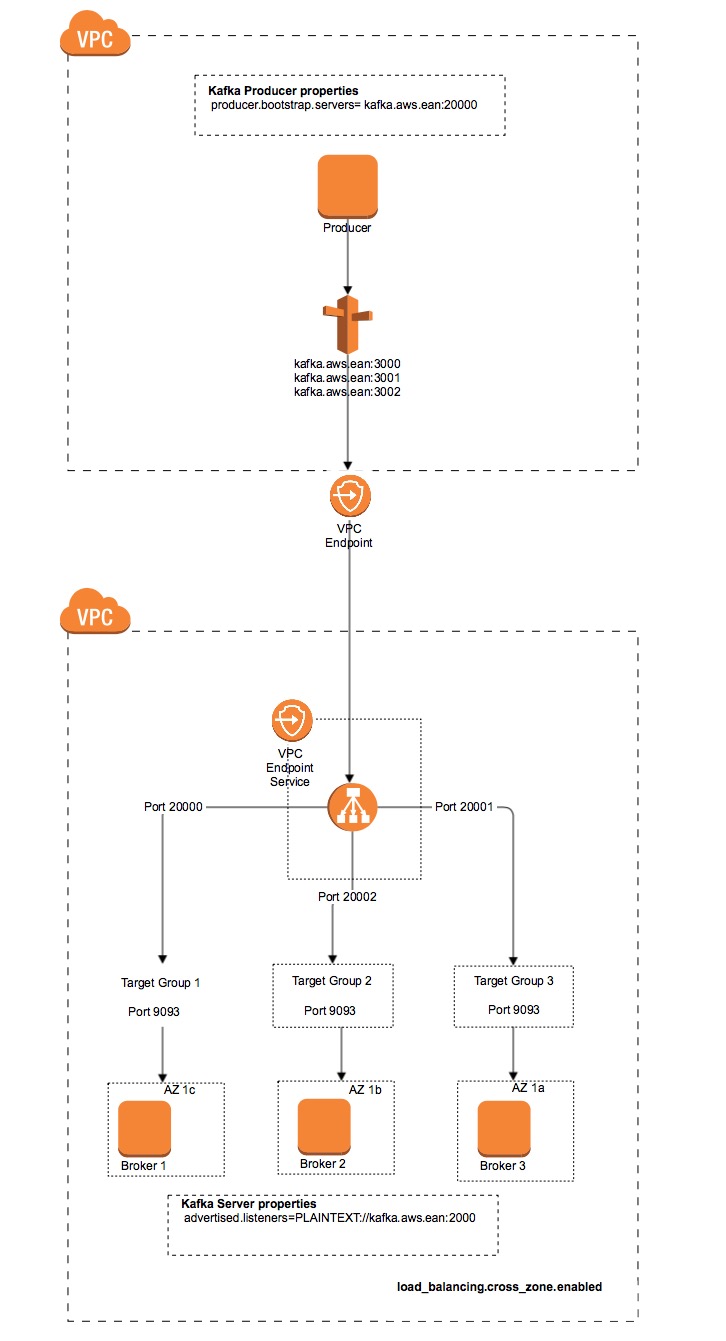
It is important to setup the property load_balancing.cross_zone.enabled to true. It allows the NLB to route the traffic to all the AZ. Our kafka cluster CF template deploys with some logic, the different kafka brokers in a different AZ to comply with the highly availability requirements in case of a AZ failover. By default this property is set to false, so, the NLB just routes data to one subnet. For more information about this property you can visit NLB cross zone balancing
The NLB contains listeners and each listener has an associated target group.
NLBListener:
  Type: AWS::ElasticLoadBalancingV2::Listener
  DependsOn:
    - NLBTargetGroup
  Properties:
    LoadBalancerArn: !Ref LoadBalancerArn
    Port: !Ref NLBPort
    Protocol: TCP
    DefaultActions:
      - Type: forward
        TargetGroupArn: !Ref NLBTargetGroup
NLBTargetGroup:
  Type: AWS::ElasticLoadBalancingV2::TargetGroup
  Properties:
    Name: !Sub ${Function}-${Environment}-T${BrokerId}${VPCEndpointCount}
    VpcId: !Ref VpcId
    Port: !Ref NLBPort
    Protocol: TCP
    HealthCheckIntervalSeconds: 10
    HealthCheckPort: !Ref TargetPort
    HealthCheckProtocol: TCP
    HealthyThresholdCount: 3
    UnhealthyThresholdCount: 3
    Targets:
      - Id:
          Ref: InstanceId
        Port: !Ref TargetPort
There are 2 ports to have in consideration here:
- NLB port
- This is the port that is used by the clients. This is the “public” port.
- These ports start by 2000, for example, 20000, 20001, 20002…
- Target port
- Port that the Kafka broker instances listen.
if we have a 3 nodes Kafka Cluster we would need 3 NLB TargetGroup-Listener pairs.
This logic that seems simple it is not possible to be implemented in CloudFormation. CloudFormation is a templating language, but it does not allow to include this kind of logic. To continue using CloudFormation and implement this requirement the only possible way we thought about was to include Jinga2 code.
{% for brokerId in range(env['NUMBER_OF_BROKERS'] | int) %}
   #Here would be defined the EC2 instance component..

  NLBTarget{{ iter }}Broker{{brokerId}}:
    DependsOn:
      - Kafka{{ brokerId }}
      - NetworkLoadBalancer
    Type: AWS::CloudFormation::Stack
    Properties:
      TemplateURL: !Sub https://s3-${AWS::Region}.amaz...
      Parameters:
        Environment: !Ref Environment
        Function: !Ref Function
        VpcId:
          "Fn::ImportValue": !Ref VpcId
        BrokerId: {{ brokerId }}
        NLBPort: {{ first_digit_port }}{{ '00' if ((brokerId | int)  <10 ) else '0' if ((brokerId | int)  <100 ) else '' if ((brokerId | int)  < 1000 )  else '-1'}}{{ brokerId }}
        TargetPort: 909{{ first_digit_port }}
        LoadBalancerArn: !GetAtt NetworkLoadBalancer.Outputs.NLB
        InstanceId: !GetAtt Kafka{{ brokerId }}.Outputs.EC2Instance
        VPCEndpointCount: {{ iter }}
  {% endfor %}
With this code we can dynamically create the number of target groups that are required for the NLB. You do not need to go into too much detail regarding the previous code, but just realize that there is a loop that iterates over the number of brokers. This allows to create multiple TargetGroup-Listener pairs per Kafka Broker per client, as it was showed above.
VPC Endpoint Service
The VPC Endpoint communication is based in two components. The VPC Endpoint Service, defined in the target VPC and the VPC Endpoint, that is defined in the client side of this communication. In our case the VPC Endpoint Service is deployed in the Kafka pipeline VPC and the VPC Endpoint is deployed in the Producers VPC.
This is the CF template associated to the VPC Endpoint Service:
  VPCEndpoint:
    Type: AWS::EC2::VPCEndpointService
    DependsOn:
      - NetworkLoadBalancer
    Properties:
      NetworkLoadBalancerArns: !GetAtt NetworkLoadBalancer.Outputs.Ref
This is the CF template associated to the VPC Endpoint:
  VPCEndpoint:
    Type: AWS::EC2::VPCEndpoint
    DependsOn:
      - SecurityGroup
    Properties:
      ServiceName: !Ref ServiceName
      VpcEndpointType: Interface
      VpcId: !Ref VpcId
      SubnetIds: !Ref SubnetIds
      SecurityGroupIds:
        - !Ref SecurityGroup
Tuning Kafka to listen for VPC Endpoints clients
The server.properties file is the main file to configure your kafka broker.
The properties that we had to change to adapt our previous brokers to the new architecture are:
advertised.listeners=INTERNAL_PLAINTEXT://:9092,CLIENT://aonxdwkafka.prod.aws.ean:20
listeners=INTERNAL_PLAINTEXT://:9092,CLIENT://:9093
inter.broker.listener.name=INTERNAL_PLAINTEXT
listener.security.protocol.map=CLIENT:SSL,INTERNAL_PLAINTEXT:PLAINTEXT
Lets explain these properties.
The advertised listeners are the endpoints that are advertised to connect with Kafka. There is one listener that accept internal communication within the same Kafka VPC. And there is one advertised listener for the client.
The listeners properties specify the different listeners used by the broker and the internal port that they are using. For internal interbroker communication it is used the port 9092. For the client the target port is 9093.
The inter broker listener name specifies the listener that is being used for interbroker communication. Obviously it would make no sense to use the client listener.
The listener security protocol map specifies the security protocol used by each of the listeners. The possible values are SSL and plaintext. If this property is not specified, the default value is plaintext.
Conclusion
As you can see creating a dynamic and scalable kafka cluster that can be used from outside of the VPC is not simple and can be a bit overengineered. But at the same time it is fun and it is doable just like everything in life.
With this implementation it is already possible to send data from one account to a Kafka cluster placed in another account. In the next chapter we will see how to make this communication secure using SSL.